
Easy ideas to diy a jewelry box with acrylic paint

Painting wooden box is a fun way to create something lovely and unique for yourself or make it a great gift box!
Painting is always fun and can bring so much pleasure to you in your free time.There's no doubt why painting is used as a therapy too.
Painting doesn't always have to be difficult and intricate.It can be used to make a simple art form and the joy it is going to bring , is for you to keep.
I love painting and enjoy teaching it too.
I paint wooden boxes in different shapes and styles and it is really great to gift in those boxes, as it makes my gift stand out and unique.
A personalized keepsake box of love, care and thought.
In this blog you can see easy steps to paint your own pretty gift box.
And turn unfinished box into a lovely memory, jewelry, jewelry or gift box.
Painting in your free time will not only bring joy and relaxation, but will also get you some personalized gifts ready, making your gifting special.
Who doesn't love keepsake boxes , fun organizing, sporting and gifting.
Supplies you need are easily available at any craft store.
Let's get started!!
Easy painting ideas for jewelry/keepsake boxes

Choose Your Box and Gather Your Materials
- wooden box of any size and shape
- sanding paper
- Gesso ( a medium used as a base coat on any wood which is going to be painted),
- paint brushes thick and thin, sponge brushes round ones,
- acrylic paint assorted colors
- an acrylic paint medium
- varnish or mod podge to do the finish coat.

Check
https://plaidonline.com/products/brand/modpodge .
You are ready to begin your project yayyy!!
Let's Start......
Step 1
Prepare the Surface by Sanding, Filling and Priming.
Preparing the surface of your box is an important step for ensuring good adhesion and a smooth finish.
Start by sanding the surface until it's completely smooth.
Make sure to fill any gouges or dents with wood filler and use a soft brush to remove all dust.
Step 2
Start by coating your box with gesso that is a medium used to protect wood from paint to not seep in it later .
Gesso is thick white paste so add some water to make it a thin paste but not runny consistency.
One coating is usually enough , wait for it to dry completely.
It may take an hour or so.
Step 3
Once dry pick a base color of your favorite acrylic paint.
Say it's yellow, if the paint is already a thin consistency you don't need to add any medium , if the paint is thick add some medium to get semi flowy consistency.
A nice generous and even coat of paint will already start its magic and make your box look so bright and beautiful, but calm down it's going to look even prettier.
Once your first coat is dry , apply a second coat to it and wait patiently.
Yes this is the most restless moment where you want your art to be ready ....sip some coffee in the meantime.
Hint:
Acrylic paint dries up fast .... :))
Now wondering what to paint on a box??
It can be just dots, flowers or tiny abstract shapes....
Step 4
Ideas on what to paint on a box simple & quick!

Use your sponge brush to make colorful dots ( sponge brush do wonders just a quick dab in paint ) with any bright and contrasting color and you are almost there.

Use acrylic markers to draw simple flowers for an abstract yet colorful look!!


Simple abstract combination of bold & fine lines with small hearts or doodle cute mushrooms, cactus, or simple dots ... .. multicolor or contrasting colors as per your choice .
Step 5
Once everything is dry apply a thin layer of mod podge or spray varnish to seal your art and give it a shine.
A quick tip.....
Mod podge is sticky as it is a form of glue and may leave prints so be careful and do not put it on the opening of the box. Let it dry completely before you close the lid as it may stick and not open , and damage your paint.
Look at your pretty trinket which you created and your hand painted box is ready to use or gift.
Congratulations on your beautiful art piece !!!
Now gift something cute and fun in this box and make your gifting extra special.
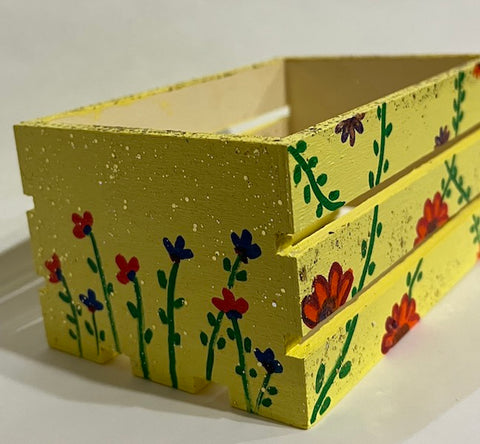
Let's create WOODEN CRATES following the same steps.
It can be used to paint old or new wooden crates for indoor and outdoor decor , storage and organizing fun.
Add colors based on your decor remember it can be matching or contrasting, colors are fun to play with.
Add a personal touch to your home decor by creating wooden crates for children's room for storing, books, toys, cushions and more.
You office room needs a little corner for storing your cords, files, magazines, make your own unique hand painted wooden crate.
Floral or geometrical designs, whatever you choose it is surely going to add a pop of color and give a personal artistic touch to your decor and giving you the satisfaction of creating something so beautiful.
Happy painting!

Checkout for more wood art and craft!!
https://sinhascreations.com/blogs/news/4-amazing-wood-craft-projects-for-beginners